11 X 9 Bedroom Ideas
3 Amazing Ways to Layout a 9' x 10' Bedroom with an Angled Wall and a Bumped-in Closet
Small bedrooms can be very challenging. But finding furniture with the right dimensions that will also fit nicely into a room that's less than 10' square is even more challenging.
Add an angled wall, a bumped-out closet, and an off-center window and you have a super tricky room to lay out.
Today I'm not only going to show you one way to layout this challenging space, but I'll also show you 3, completely unique ways to do it.
My clients wanted options.
This room is one space in their vacation home.
Per their request, since they were planning to have extended stays at the property, and because it was over a thousand miles from their primary home and jobs:
-
They potentially needed an "office" area for remote work. (I put office in quotes because it could be a small desk instead of a dedicated office space, make sense?)
-
They also planned to host friends and family for short stays, so this room needed to function as a dedicated bedroom at least some of the time.
-
And, the potential 3rd possibility for the space was a spot for relaxing and curling up with a good book. This option would be a chill out space. So, a pull-out sofa or some other convertible piece would be needed.
They also weren't committed to any one purpose for the space over another. It was really about what would fit the best.
Want to see what fits in a 9' x 10' bedroom with an angled wall and a bumped-in closet?
Let's unpack the actual room and dig a little deeper into the design brief.

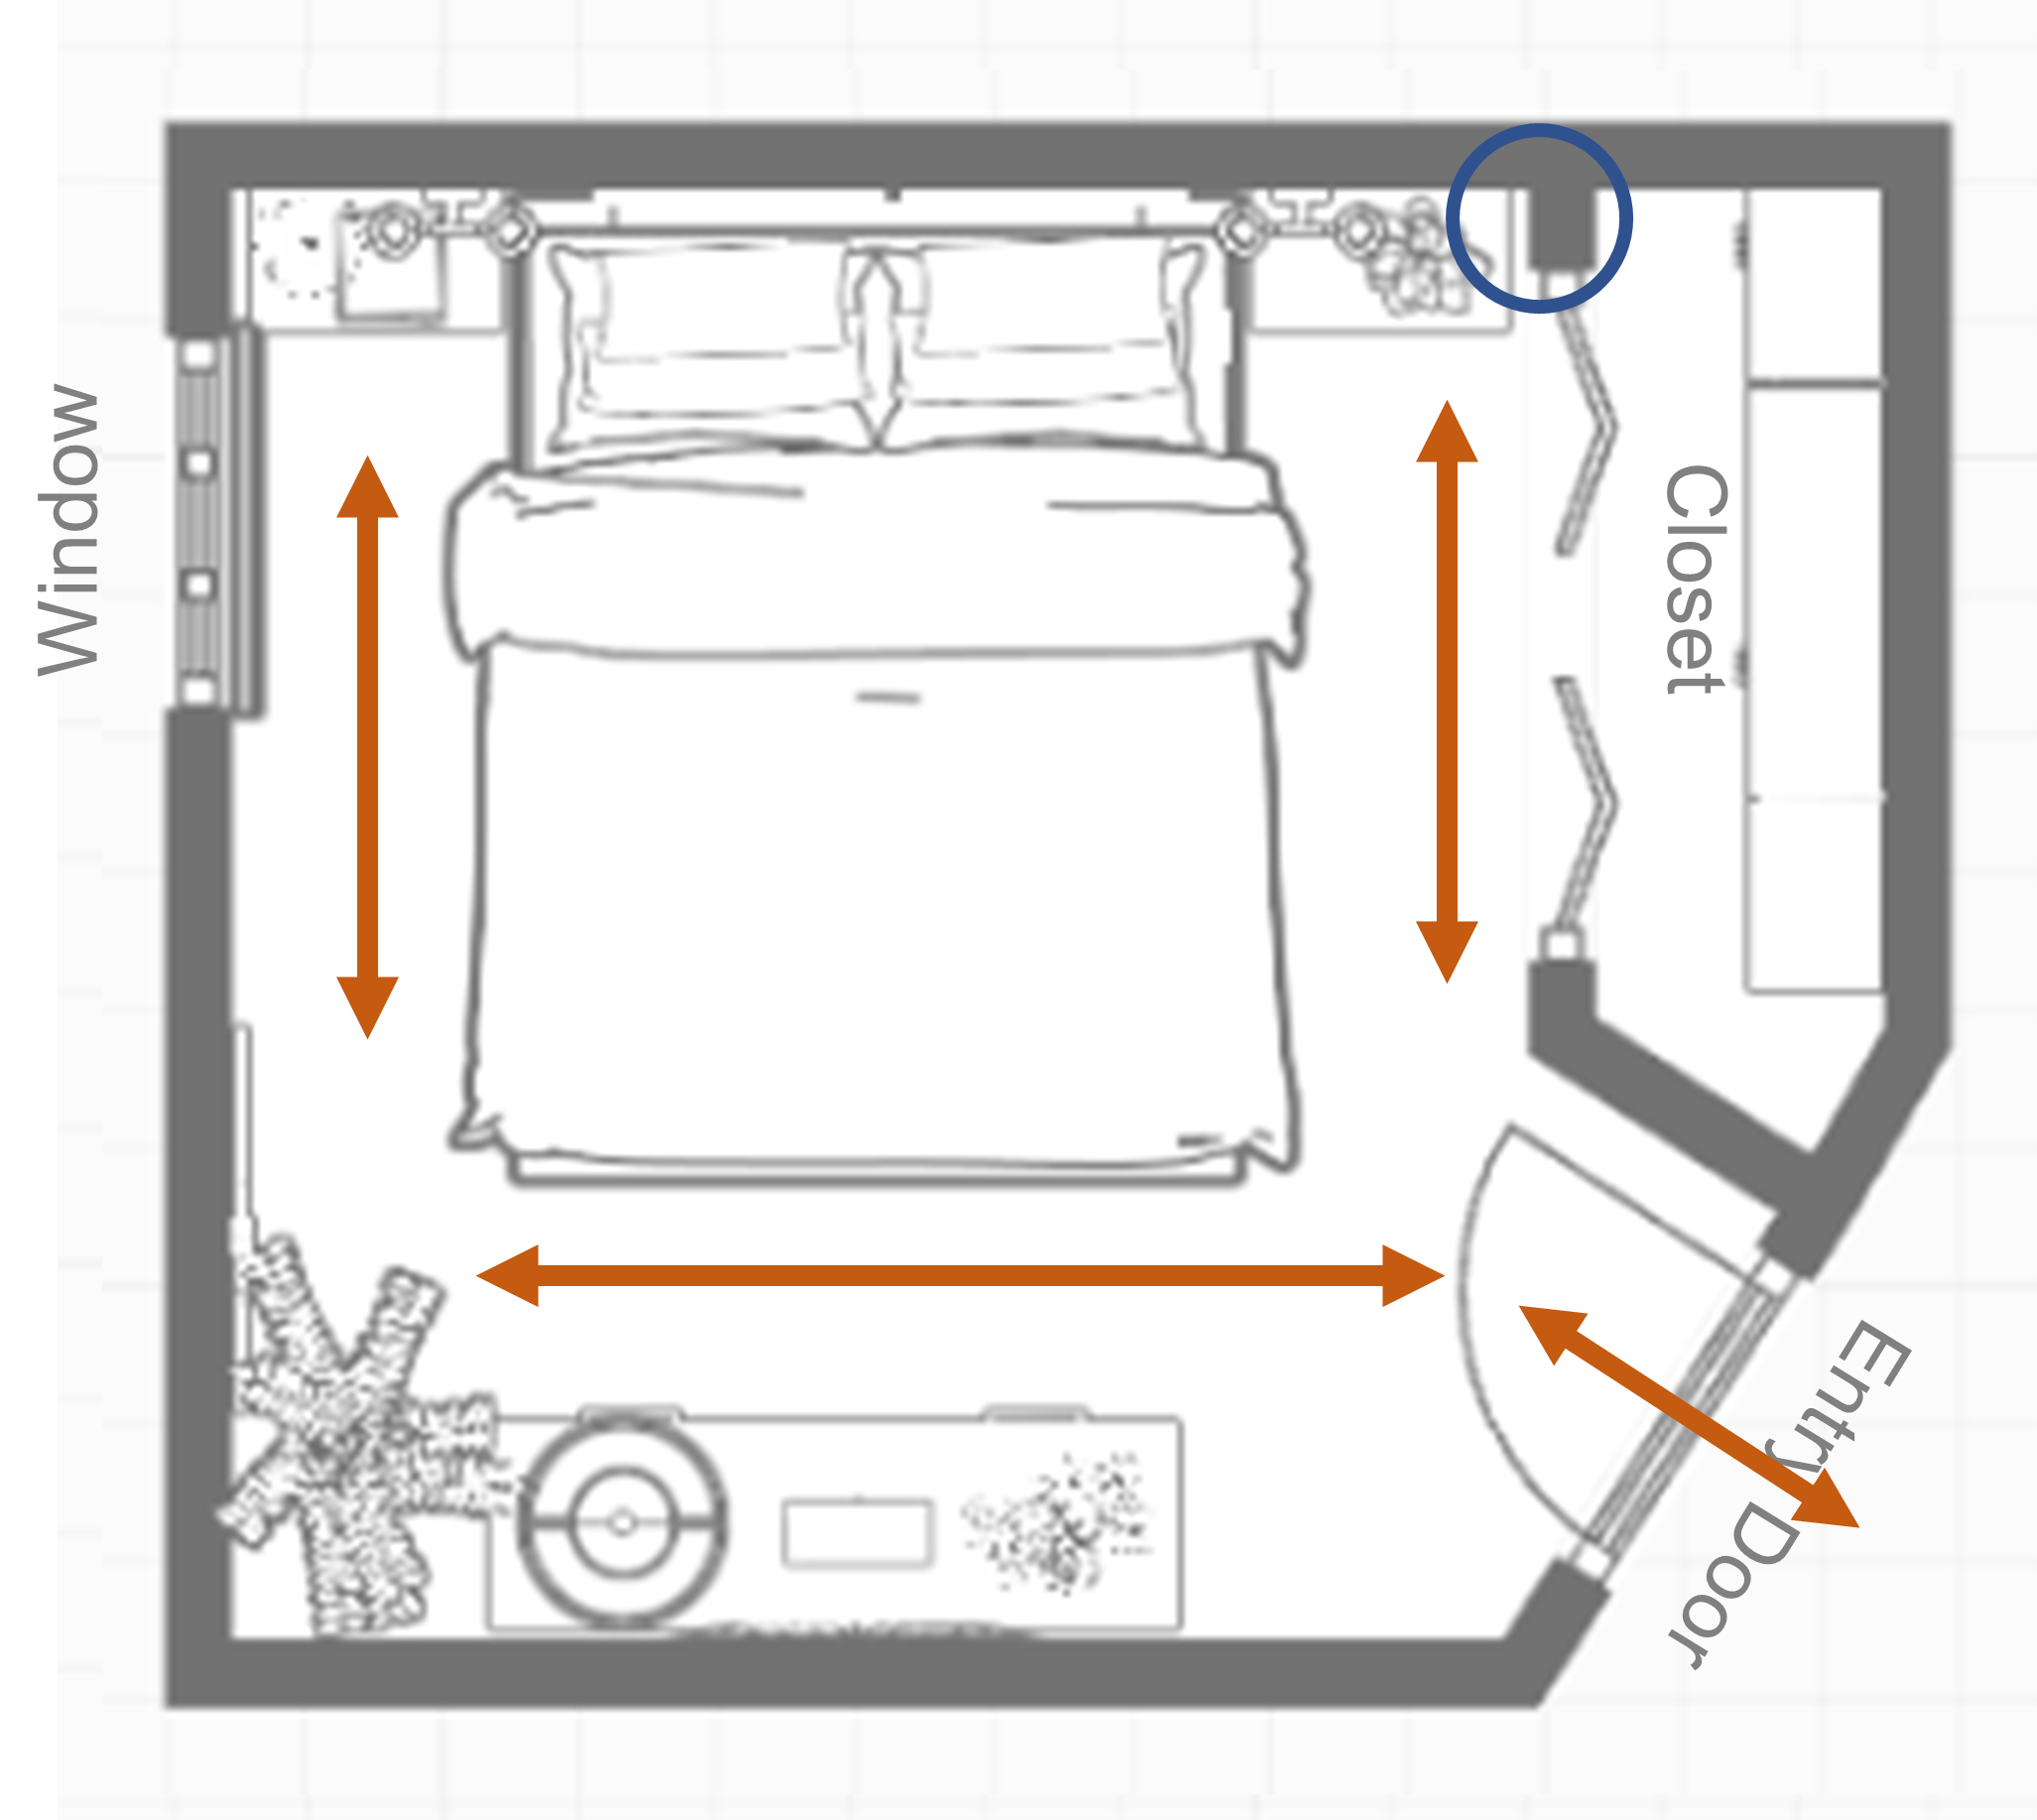
This picture is shot form the angled doorway looking into the space.
What you can't see on the left-hand side is a wall section without another window. That means that the only window in the room is positioned almost into the corner of the right-hand side of the back wall.

Right behind this door there's a closet that bumps into the space which takes up a 2 foot plus chunk of floor space.
In my vlog I included video footage of the space so you can get a better sense of the size.
Measure the Room

I'll start where I always start and that's with accurate measurements.
This isn't the glamourous part, but it is the most necessary part for any makeover or redesign. I never make any decisions without doing this first.
You always want to know the dimensions of each wall so you know what will fit.
This saves you from buying furniture that's too big or too small and it also prevents you from attempting to place furniture you already own in places it won't fit.
-
Here, the longest wall is the window wall at 10' 4".
-
The next largest wall is the wall perpendicular to the window, 9' 4".
-
The third largest wall is the wall adjacent to the angled door, 9' 2".
Determine The Tricky Spots
Before getting into furniture placement, I always make sure to go through the empty floor plan to determine the tricky spots that I need to pay extra attention to.

For this room, I must not block the closet doors with furniture. The louvered closet doors need to pull fully open and there shouldn't be anything in the way to hinder that.
The space right inside the angled doorway looks like it could be a good spot for something small, but whatever goes there can't be too deep or pop off the wall too far because you don't want to sidestep around something to get into the room. What a hassle, right?
The other thing that jumps out at me is the off-center window. I don't have a problem with putting furniture in front of windows. In a room this size you likely can't avoid it.
My anticipation is that the window's position will pose more of an aesthetic problem.
It could cause my décor to be unbalanced. An off-center window like this makes it hard to place décor to visually balance the space. It's not impossible though.
Figure Out the Pathways
This combination of knowing the measurements of each wall and anticipating the tricky spots gets me to the next step which is usually determining pathways.
For this room there is only one way in and one way out, so navigating through the room isn't going to be an issue. It's all about making sure there's enough room to move comfortably into the space and not hinder any functions that need to happen.
If this was a passthrough space, like a room with multiple doorways, I would definitely spend some time anticipating the pathways in and through.
Think About Furniture Placement
One of my steadfast rules is the largest furniture goes on the longest unobstructed wall. It's one of the "design rules" I think makes a lot of sense.
Following this rule keeps things simple and usually helps to eliminate a lot of confusion because that largest piece can also be the trickiest to place. After it has a home, everything else can be placed to work around it.
I'm all for keeping it simple, but when you have a design brief that requires a few different options, you may need to break that steadfast rule.
Stick around because I'll show you how to break this rule and when it's a good idea to do so.
Option 1: The Bunk Room

For the first design, I'm gonna stick to the rule of largest piece on the longest wall.
And in this case, the largest piece is a couple of twin beds.
The rationale is that it's a great option for two guests to share -siblings, friends, you name it.
From a design perspective, having two twin beds on the longest wall still allows you to walk unencumbered into the space because there's plenty of room to navigate the bottom of the bed nearest the door.
There's a generous amount of space between the two beds to move comfortably into and out of each bed – thanks to the larger shared bedside dresser.
And, there's very adequate space at the foot of the second bed allowing you to open the closet doors without any obstruction.


This allows that back longest wall to become the focal point in the room. This awkward wall becomes symmetrical and balanced.
That might seem extra but, leaving the wall above the first bed empty would make the space feel unfinished. It would feel like there was a blank hole where something should be.
Tip: So, a good thing to remember is, when you have two identical pieces of furniture in any room, it's best to carry the symmetry established by those pieces all the way up the wall by including similarly sized décor.
If there wasn't a window on the far right, I would still place two framed pieces of art, or two tapestries or two of something else. What you choose doesn't have to be identical, but it should take up the same amount of space.
I happen to like the repeated identical layering, so that's what I did.
The curtains soften the wall, add height and the mirror not only mimics the window, but it also reflects and increases all the light in the room.
Plus, mirrors are always functional, and most bedrooms should have at least one, don't you think?
Art
I kept the art in the room simple.
Two large pieces to flank the two opposite walls almost like bookends framing the room. They're simple, not a lot of color and that's intentional.
I felt that the room needed to be "quiet".
Bright, saturated colors would make it feel busy. People on vacation tend to want to feel relaxed, so there's an almost calm, almost resort feel to the room.
The art in between the beds above the shared chest, is long. It doesn't match the height of the curtain rods. Instead, there's an intentional variation in scale and that makes it interesting.
This piece also nonrepresentational art. It's just textural and calm.
The lamp in front of it adds to the layering and texture with a smart metallic finish.
I kept the surface of the chest uncluttered so that guests could place their own stuff there.
The Furniture
The arched headboards introduce a new shape to the space. The curves soften the look so that not everything has straight lines in the room.
The black, iron finish adds a grounding effect. The color black is also peppered in with the art frames and lamp.
The beds also have no footboards. This is important because the absence of footboards saves at least 4".

In a space this size, that can mean the difference in how the door opens. Plus, it feels much more spacious because there isn't a visual barrier that a footboard would create right as you walk in.
I chose a bed with simple lines, no heavy carvings, no intricate details.
In small spaces keep stuff simple.

Because the second bed is placed in front of the window, I wanted a headboard that didn't obstruct the light or hinder the function of the window itself. So, the open spokes instead of a solid panel made all the difference.
Option 2: Small Office/ Relaxing Nook

This space is a combination of work and rest.
There's a small writer's desk on the wall to the left of the angled doorway and a daybed opposite the desk.
There's a hidden trundle mattress underneath the daybed allowing for two people to sleep comfortably in the room, so essentially, it's still a guest room/office/relaxing zone.
Breaking the Largest furniture on the Longest, Unobstructed Wall, Rule
As I mentioned earlier, sometimes it's not possible to place the largest piece on the longest wall and that's okay.
As you will see, knowing when to break this rule will depend on finding other pieces that will make sense to support this decision.
The Furniture
I'll admit, I played around with the placement of the furniture in this version for a long time before I was comfortable with the layout.
I could've found a daybed to fit on the back, 10' 4" wall, no problem. In fact, I found plenty of great options to fit in that spot.
However, my intention from the start was to find a desk that would also fit nicely into this design. I soon found out that this combination of functions added to the trickiness of this layout.
First, I did not want my client to have her back to the entry door while sitting at the desk. I just don't like that feel of that. I prefer being able to see the door.
So, my most viable option was to place the desk on the wall beside the angled doorway.
I knew it didn't need to be a big, executive style desk because that would overwhelm the room and because my client didn't need that.

So, I found a smaller, writer's desk that fit the wall perfectly.
Since I wasn't going to place the daybed on the long, window wall, I decided to put 3 floating shelves on that wall to hold books and décor.
The shelves balance the off-center window nicely and they add functionality as well.
To further mimic the height of the window side, I placed a small credenza under the floating shelves. This mirrored the verticality of the window and curtains next to it.

Tip: Remember, you don't have to match the off-center window exactly, just match the space that it takes up.
The last piece of the puzzle was the daybed itself.
As I mentioned, it wasn't hard to find a daybed. It was very hard to find one that fit on the wall beside the closet.
I seemed to find the style I was looking for easily, but each one I came across was too wide.
There had to be enough room to open the closet doors on the side near the edge of the bed. So, the length of the bed could not obstruct that function.
I had a few non-negotiables in mind:
-
I wanted as much interior space on the daybed as possible. That meant I was on the lookout for one that would be comfortable for a taller person as well as a shorter person. I soon discovered that meant I was looking for an option that had thin arms- nothing rolled or bulky.

Many times, thinner arms mean more interior space.
More importantly, thinner arms also mean it takes up less space all together- imperative when you have closet doors so close.
-
I also knew I wanted to find something that had some upholstered detail to it.
When I found this bed, it ticked all the boxes.
It had skinny arms, a longer interior mattress, and a few pretty details in the form of tufting and nail trim.
Best of all, it fit the wall and still allowed for the closet doors to open and close freely. It's tight but it worked!
The Décor
I kept the décor minimal.
Again, I didn't want to overwhelm the space with a lot of stuff, so a large mirror on the wall above the daybed and perpendicular to the window is pretty and reflects light.
It was large enough to fill the space nicely but simple enough to not compete with the daybed, which was the focal point of the room. Its purpose is to direct the eye where to look. Make sense?
The pillows are a mix of similar tones with just enough contrast to the upholstery to be cozy and relaxing.
I went with neutral wood on the shelves and painted white wood furniture to keep the aesthetic light and bright.
Pathways
As you can see, the pathways are clear and that makes for a very pleasing space to be in.
![]()
You can practically dance in the middle of the room!
Option 3: The Dedicated Guest Suite
This version is all about creating a special retreat for a guest or a couple. It's not meant to be multi-functional.
I decided to show how changing a couple of little things could change the entire look of the room, so I painted the walls white and added a geometric wallpaper to the wall behind the bed.
This reinforces the focal point, but the bed itself would have easily accomplished creating a natural focal point without it.
The Pathways
The way into and through the room is comfortable and open. It doesn't leave a ton of space, but it's very adequate.
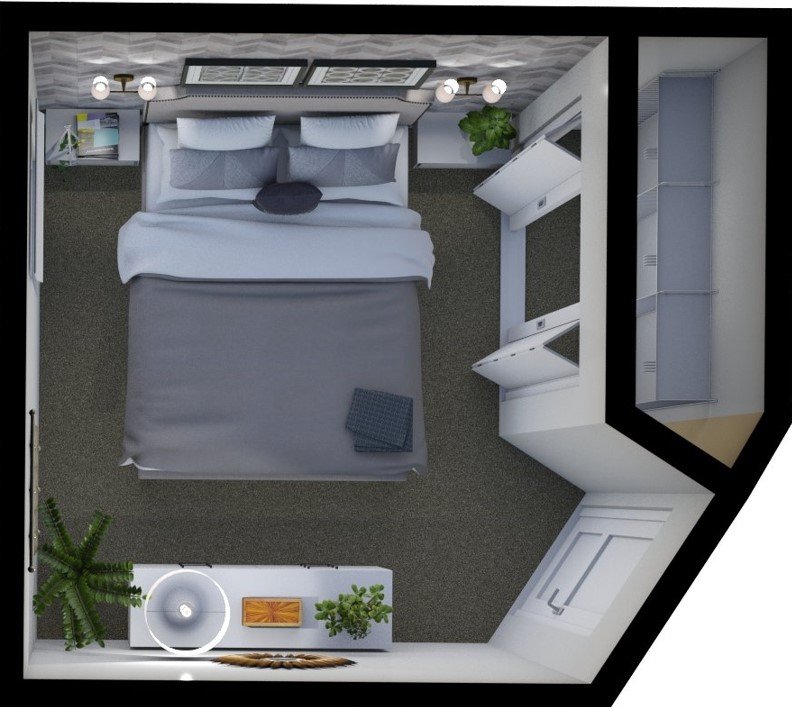
There are no obstructions to opening and closing the closet doors and you can navigate to either side of the bed with ease – always important.
You can fully access to the window as well, also always important.
The Furniture
So, much like the daybed, I chose to put the bed on the wall perpendicular to the closet. This was tricky.
The main reason for the placement of the bed was because I didn't want to put it on the long window wall because of the off-center window.
Certainly, it would fit there but it wouldn't leave me enough room for the dresser opposite it. (More on that in a second...)
The bed is a queen size. I know! A queen size bed in a 10' x 9' room with tricky architecture!

Here's the reasons why this works:
First, the bed has a practically no footboard. It is still a fully constructed bed, but the bottom is attached to the side rails and there isn't a tall or bulky footboard to take up space. A tall footboard in this small room would create a visual barrier making the bed feel imposing instead of inviting and, there just isn't the room for it.
To make this bed to work, I needed to find bedside tables that were shallow enough, especially on the closet side, to not impede the opening and closing of the doors.
The solution was these wider, shallow depth tables that fit behind the swing of the louvered door.
They also worked because they helped with the navigation of the room. They're "large" enough to create the balanced pathway on both sides of the bed.
On the opposite side, the dresser was purposefully sourced to be shallow as well.
I didn't want something to bump too far off the wall because it would've cut into the pathway at the bottom of the bed and that would potentially also partially block the doorway.
This dresser is not very wide either which allowed for a little more breathing room being so close to the angled doorway. The result is you can walk freely into the room without worrying about bumping into the dresser.
The Décor
Again, I kept the stuff to a minimum and really paid attention to the subtle gray and white color scheme. Everything in the space worked in tandem with that color direction.

Instead of having table lamps beside the bed, I opted for two sconces that were placed higher above the bed so someone would have a nice amount of reading light if desired.
The absence of table lamps also makes the wall feel more spacious. You literally have elbow room on both sides of the bed.
The art above the bed is subtle and geometric like the wall covering and the bedding is super neutral, picking up hints of white, charcoal and gray from the rest of the décor.
Across from the bed, the mirror above the dresser is a nice thing to look at and features a contrasting copper color that makes it a bit special.
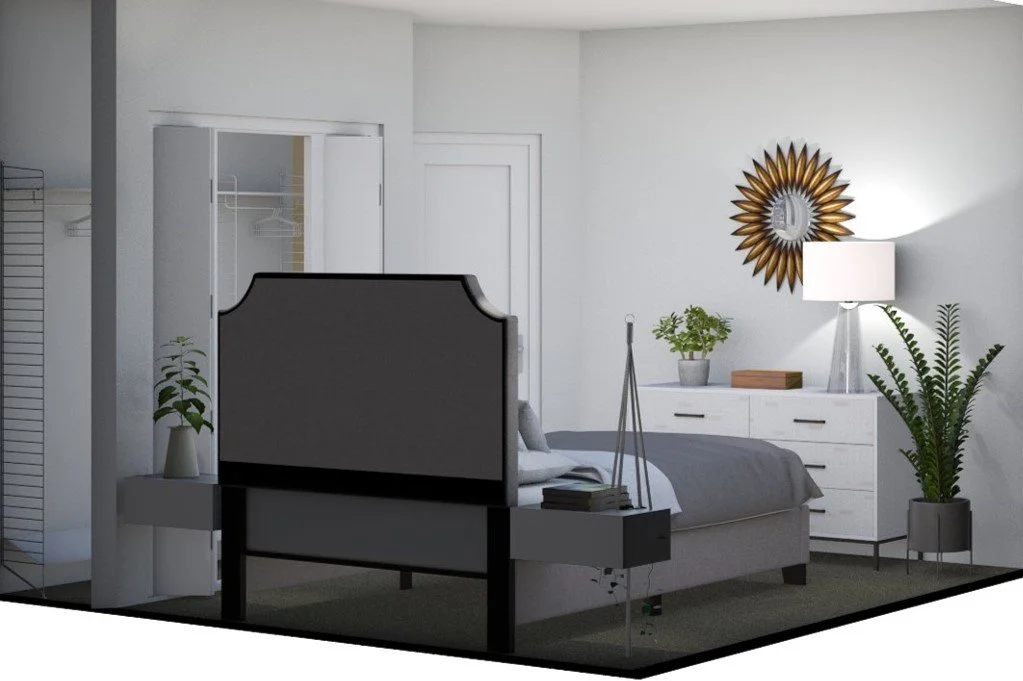
There's a clear, unfussy lamp on the dresser for additional light and couple of plants to add some organic décor.
The space is bright, welcoming, and relaxing.
And that's how you arrange and decorate a 10' x 4' bedroom with an angled wall and a bump-in closet.
Whew! That's a lot of considerations, right?
-
If you remember to always know your room dimensions.
-
Carefully consider the functional components of your room: like door swing directions, access to windows and any others, and plan your pathways; you'll be off to a solid start when you plan your makeovers.
Which one is your favorite? Do you have a similar small room that you're puzzled by? What would you do differently? Leave me a comment below and tell me all about it.
If you want to know which option my client picked, it's all in the video above. I think you'll be surprised 😊
Until next time, keep your dreams big for your small and tricky space!
Join the Fun!
If you enjoyed this post and you want to keep seeing my weekly blog, the best way to do that is to subscribe.
You can subscribe by downloading my 11 Secrets Only Designers Know to Make Your Space Rock. If you're curious about how decorators and designers make a home look magazine ready, you'll love taking a gander at these 11 secrets. You'll learn how to style your room from the floor up and it will work for ANY space you have.
You can also subscribe by taking my What's Your Decorating DNA? quiz. It's perfect to help you find your predominate decorating style so you can shop with confidence for anything your home needs.
I write about small space design and decorating, sustainable furniture options, positive self care and a variety of do-it-yourself home décor.
I'd love to connect with you!
"Michael Helwig was top-notch, very professional and responsive to my needs. He allowed me time to explore ideas and try out a variety of combinations until we found the perfect fit. Michael provided detailed information and offered beautiful ideas to make my dream living room become a reality. The furniture he sourced has totally transformed my living room space. Everyone that has seen my new living room has one word, WOW! A special thank you to Michael for a wonderful experience."
"Michael was very knowledgeable and guided us, with great patience and good humor, through the process of designing our dining room and helping us find the perfect sleeper sofa. He offered really helpful advice when we asked questions - which was often - but at no time did we ever feel pushed. He helped me when I felt like I couldn't make one more decision. When my new furniture finally arrived I realized everything down to the pillows was perfect. I couldn't be happier!"

Michael is principle designer and blogger at Michael Helwig Interiors in beautiful Buffalo, New York. Since 2011, he's offered online interior e-design services for small spaces ranging from coaching, product sourcing and full room plans with installation guidance. He is a frequent expert contributor to many National media publications and news outlets on topics related to interior design, home decorating, manifestation and the Law of Attraction. Michael happily shares his experience in the world of home decorating and design to help folks avoid expensive mistakes and decorating disappointments. You can follow him on Pinterest, Instagram and Facebook @interiorsmh.
Source: https://michaelhelwiginteriors.com/2017-blog/2021/10/29/what-fits-in-a-9-x-10-bedroom-with-an-angled-wall-and-a-bumped-in-closet
